High Altitude No-Knead Sourdough Bread
This rustic sourdough loaf is designed for high altitude baking, with a crisp crust and soft interior.
Equipment
- Dutch Oven
- Digital Kitchen Scale
- Large Mixing Bowl
- Parchment Paper
- Banneton or Cloth-lined Bowl
- Bread Lame or Razor Blade
- Spatula or Wooden Spoon
- Bench Scraper optional
- Bread Knife optional
Ingredients
- 150 g active sourdough starter
- 360 g warm water 1 ½ cups
- 10 g kosher salt 1 ½ teaspoons
- 500 g bread flour
- white rice flour optional for dusting
Instructions
Activate the Starter
- On the day you’d like to make the bread, feed your starter several hours beforehand using equal parts flour and water. The starter should have a thick pancake batter consistency. Allow it to rise until bubbly, active, and roughly doubled in size before using. Depending on the temperature of your kitchen, this can take anywhere from about 3–8 hours.
Mix the Dough
- In a large bowl, combine the sourdough starter and warm water (105–115°F).
- Add the kosher salt and stir to dissolve.
- Add the bread flour and mix until a shaggy dough forms.
- Cover with plastic wrap or a damp kitchen towel and let the dough rest for 30 minutes.
Stretch & Folds
- After the initial 30-minute rest, begin the stretch and folds. Using wet hands so the dough doesn’t stick to your fingers, grab one side of the dough, stretch it upward, then fold it over itself. Turn the bowl and repeat until you’ve gone all the way around the dough (about 6 times).
- Repeat this process 3 more times, spacing each round 30 minutes apart.
- After the final stretch and fold, cover the dough and place it in the refrigerator overnight.
First Rise (Bulk Fermentation)
- The next morning, remove the dough from the refrigerator and let it rest on the counter for 1 hour to warm slightly.
- After removing the dough from the refrigerator and letting it rest, check the rise. If the dough has not doubled in size, place it somewhere warm to continue rising. I use the “Bread Proof” setting on my oven (95°F).
- Let the dough rise in the warm oven for about 3–4 hours, or until noticeably puffy and roughly doubled in size. If your dough has already doubled after resting on the counter, you can skip the warm oven step.
Shape & Final Rise
- The dough is ready to shape when it has doubled in size, looks puffy and airy, and jiggles slightly when the bowl is gently shaken.
- To shape the loaf, gently place the dough onto a lightly floured surface. Fold the edges of the dough inward toward the center to create tension, then flip the dough seam-side down. Using your hands or a bench scraper, gently pull and rotate the dough against the counter until a tight, smooth round ball forms. Avoid deflating the dough too much while shaping.
- Place the loaf seam-side up in a floured banneton or a bowl lined with a floured cloth or towel. Rice flour works especially well for dusting because it helps prevent sticking better than regular wheat flour.
- Let the loaf rest for 30–45 minutes. The dough is ready when it springs back slowly when gently pressed.
- Preheat the oven to 450°F.
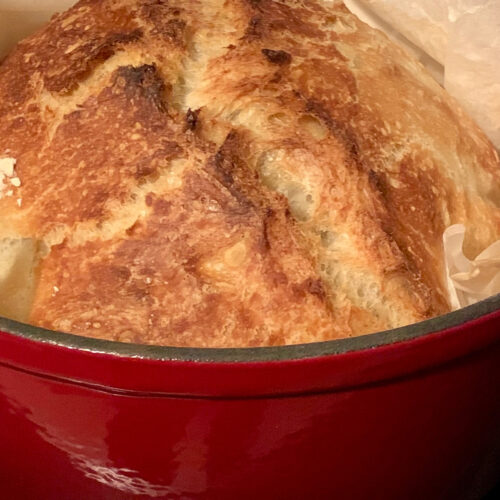
Bake
- Turn the dough onto a sheet of parchment paper.
- Score the top of the dough by making a 3-4 inch slash in the center of the dough using a bread lame or sharp knife. The cut should be about 1/4-inch deep.
- Transfer the dough and parchment into the Dutch oven.
- Add water for steam: Pour about 1½ Tablespoons of water on each side of the dough (3 Tablespoons total).
- Place the Dutch oven on a baking tray and bake:
- 25 minutes covered with a tightly fitted lid or foil
- 15 minutes uncovered
- Bake until deeply golden brown and the internal temperature reaches about 205–210°F.
- Let the bread cool completely to room temperature before slicing to avoid a gummy texture.
Notes
- My preferred schedule is to feed the starter in the morning, mix the dough in the afternoon, and refrigerate the dough overnight after the stretch and folds so it’s ready to bake the next day. You can also refrigerate the shaped dough overnight for the final proof if you prefer to bake the following morning.
- Rice flour is ideal for dusting the banneton or cloth-lined bowl during the final proof, since it helps prevent the dough from sticking.
- During the final rise, if the dough springs back immediately when pressed, it may need more proofing time. If it doesn’t spring back at all, it may be slightly overproofed and needs to be baked immediately.
- For an extra crispy crust, place the Dutch oven in the oven while it preheats.
- Placing the Dutch oven on a baking tray can help prevent the bottom of the loaf from becoming too dark or burning.
- Add any mix-ins, such as caramelized onions, herbs, cheese, roasted garlic, or olives, during the 4th stretch and fold.